

How to Use a Scissor Jack Safely for Your 4WD Repairs and Maintenance
Your 4x4's Safety Depends on More Than Just Knowing Where to Place a Jack
It's about mastering the entire lifting process.
Whether you're dealing with a flat tire or performing routine maintenance, using a scissor jack correctly is crucial for your safety and your vehicle's protection.
Steps to Use a Scissor Jack Safely on Your 4WD:
- Park on level, firm ground.
- Locate the correct jacking points.
- Engage the parking brake.
- Use wheel chocks.
- Raise the vehicle slowly.
- Always use axle stands for support during maintenance work.
⚠️ SAFETY WARNING:
Never work under a vehicle supported only by a scissor jack. Always use proper axle stands for additional support during maintenance work.
Quick Guide to Safe Scissor Jack Usage
Before we dive into the details, here's what you need to know about safe scissor jack operation for your 4WD vehicle:
Essential Equipment:
- Scissor jack rated for your vehicle's weight
- Axle stands
- Wheel chocks
- Level, solid surface
Safety Prerequisites:
- Park on firm, level ground
- Engage the parking brake
- Put transmission in park or first gear
- Place wheel chocks
Key Safety Rules:
- Never exceed the jack's weight rating
- Always use designated jacking points
- Never rely solely on the jack for support
- Keep clear of underneath while only supported by the jack
"Never get under the vehicle when it is supported only by a jack. Always use axle stands for added safety."
At 4x4 Down Under, we've seen too many DIY repairs gone wrong due to improper jack usage. That's why we're sharing our comprehensive guide to help you master this essential skill safely and effectively.
Choosing the Right Location
The success and safety of using a scissor jack starts well before you lift your vehicle. Selecting the right location is crucial for safe technical maintenance of your 4x4.
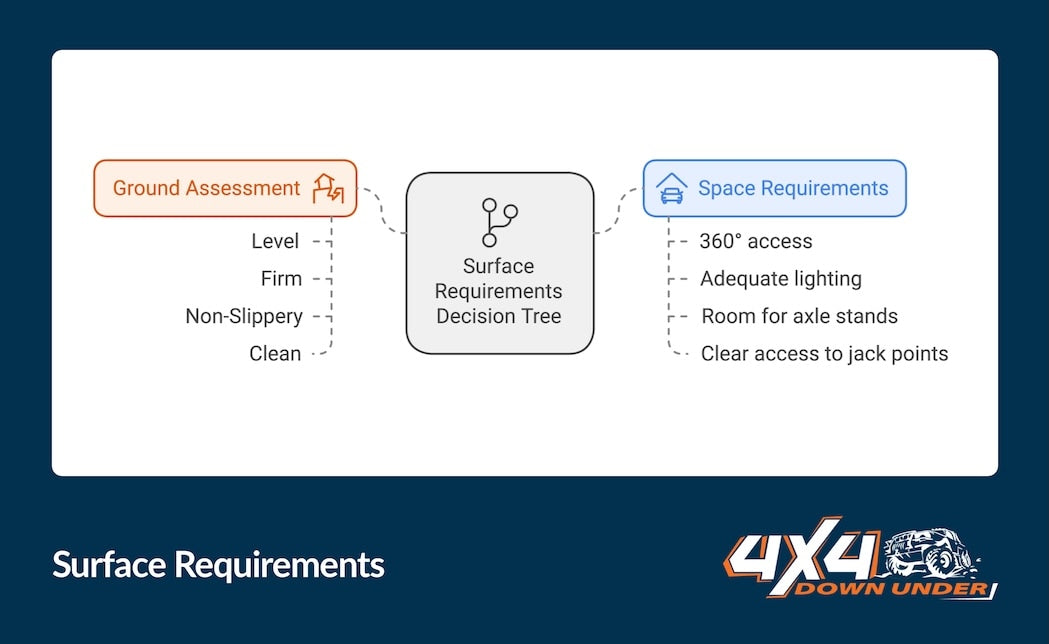
Surface Requirements
When it comes to jacking up your vehicle, not all surfaces are created equal. Here's what you need to look for:
- Level Ground: Even a slight incline can cause your vehicle to shift dangerously.
- Firm Surface: Avoid soft soil, sand, or gravel that could give way under pressure.
- Non-Slippery: Ensure the surface provides good grip for both the jack and your feet.
- Clean Area: Remove any debris that could interfere with jack stability.
⚠️ LOCATION WARNING: Never attempt to use a scissor jack on soft, uneven, or sloping ground. This is particularly crucial for heavier 4WD vehicles.
Space Considerations
Before setting up your jack, ensure you have:
- Enough room to move freely around all sides of the vehicle.
- Sufficient lighting to see what you're doing.
- Space to position axle stands correctly.
- Clear access to jacking points.
Environmental Factors
We know the Australian climate can be unpredictable, so consider these environmental factors:
| Condition | Risk | Solution |
|---|---|---|
| Rain | Slippery surfaces | Work under cover or wait for dry conditions |
| Extreme Heat | Hot surfaces | Choose shaded area or work during cooler hours |
| Wind | Vehicle instability | Find a sheltered location |
| Poor Light | Reduced visibility | Use additional lighting or wait for daylight |
Location Checklist
Before proceeding, verify these essential points:
Surface Check:
- ✓ Level ground confirmed
- ✓ Solid, stable surface
- ✓ No loose materials
Space Check:
- ✓ Adequate working room
- ✓ Good visibility
- ✓ Easy access to all sides
Safety Check:
- ✓ Away from traffic
- ✓ Protected from weather if possible
- ✓ Emergency access available
Remember: A few extra minutes spent choosing and preparing the right location can prevent hours of trouble — or worse, serious accidents.
Finding and Using Correct Jacking Points
One of the most critical aspects of using a scissor jack safely is knowing exactly where to place it. Using the wrong jacking point can result in serious damage to your vehicle or, worse, cause dangerous instability during lifting.
⚠️ CRITICAL SAFETY NOTE: Using incorrect jacking points can cause severe vehicle damage and create potentially life-threatening situations.
How to Locate Your Vehicle's Jacking Points
Check Your Owner's Manual
- Look for the vehicle lifting section.
- Note any specific instructions for your model.
- Pay attention to weight ratings and restrictions.
Visual Identification
- Look for reinforced areas under the vehicle.
- Search for arrow markers or notches.
- Identify flat, sturdy surfaces designed for jacking.
Common Jacking Points
- Frame rails (marked locations)
- Reinforced body seams
- Designated lifting points near wheels
Common Jacking Point Mistakes to Avoid
| Incorrect Point | Risk | Correct Alternative |
|---|---|---|
| Body Panels | Panel damage and instability | Designated frame points |
| Differential Housing | Component damage | Frame rails |
| Suspension Components | Part failure and vehicle drop | Manufacturer-specified points |
| Plastic Trim | Breakage and instability | Reinforced metal areas |
Preparing Your Jacking Point
Before placing your jack, ensure you have all the necessary tools and equipment ready:
Pre-Jacking Checklist:
- Clean the jacking point area
- Check for rust or damage
- Remove any debris or dirt
- Verify the surface is flat and stable
Position Verification
Before applying any lifting force, double-check these crucial points:
- Jack is centered on the lifting point
- Contact surface is clean and stable
- No obstructions are present
- Jack base is fully supported
Pro Tip: If you're ever unsure about a jacking point, it's better to consult your manual again or seek professional advice. When it comes to safety, there's no such thing as being too careful.
Essential Safety Steps Before Lifting
Proper preparation is crucial for safe vehicle lifting. These pre-lifting steps are non-negotiable for ensuring your safety and preventing vehicle damage.
⚠️ PREPARATION WARNING: Never skip these safety steps, even for quick jobs. Most accidents happen when people take shortcuts with preparation.
Required Safety Equipment
Before you start, gather these essential items:
| Equipment | Purpose | Important Features |
|---|---|---|
| Wheel Chocks | Prevent vehicle rolling | Heavy-duty, non-slip design |
| Axle Stands | Secondary support | Correct weight rating |
| Work Gloves | Hand protection | Good grip surface |
| Torch/Light | Visibility | Hands-free option preferred |
Vehicle Preparation Checklist
Follow this systematic approach to prepare your vehicle for lifting:
Park and Secure:
- ✓ Park on level ground
- ✓ Turn off engine
- ✓ Remove all passengers
- ✓ Remove heavy cargo
Engage Safety Features:
- ✓ Apply parking brake firmly
- ✓ Put transmission in 'Park' (automatic) or First gear (manual)
- ✓ Turn wheels to appropriate angle
Wheel Chocking:
- ✓ Place chocks on opposite end wheels
- ✓ Use two chocks per wheel (front and back)
- ✓ Ensure chocks are firmly seated
Proper Wheel Chocking Technique
"Use wheel chocks if you are changing a tire on an incline to prevent the vehicle from rolling."
For Front Wheel Lift:
- Place chocks behind rear wheels
- Ensure tight contact with tires
- Check stability before lifting
For Rear Wheel Lift:
- Place chocks in front of front wheels
- Verify chocks can't slide
- Test security before proceeding
Final Safety Verification
Vehicle Security:
- ✓ Vehicle completely stationary
- ✓ Parking brake holding firmly
- ✓ Transmission properly secured
Equipment Check:
- ✓ All tools within easy reach
- ✓ Safety equipment ready
- ✓ Lighting adequate
Environment Check:
- ✓ Working area clear
- ✓ Surface still stable
- ✓ Weather conditions suitable
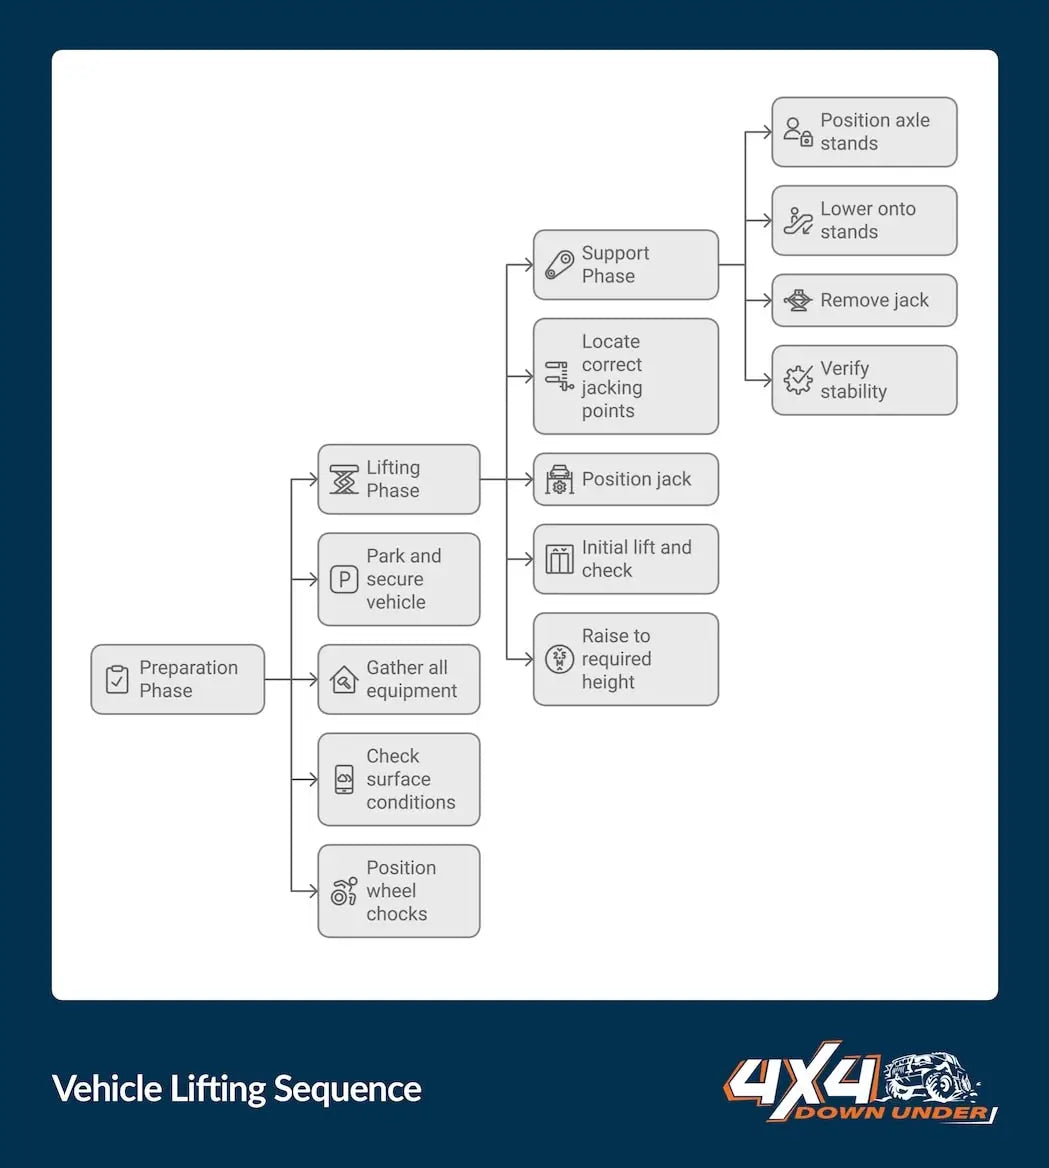
Step-by-Step Jacking Procedure
Now that you've properly prepared your vehicle, let's walk through the actual jacking process. Following these steps precisely will help ensure a safe lifting operation.
⚠️ CRITICAL SAFETY NOTE: If at any point during the lifting process you notice instability or unusual movement, carefully lower the vehicle and start again.
Initial Jack Positioning
Position the Jack
- Place jack flat on the ground
- Align with marked jacking point
- Ensure jack is fully collapsed
- Check base is stable and level
Verify Alignment
- Center jack under jacking point
- Double-check position
- Ensure no obstructions
The Lifting Process
Follow these precise steps when raising your vehicle with a scissor jack. We recommend having all your maintenance equipment ready before starting:
Initial Contact
- Raise jack slowly until contact
- Verify centered position
- Check for any tilting
Early Lift Phase
- Continue raising slowly
- Watch for proper engagement
- Listen for unusual sounds
Main Lifting
- Maintain steady rhythm
- Monitor vehicle stability
- Check surrounding area
Final Height
- Raise to required height
- Avoid over-extension
- Verify stability again
"Raise the scissor jack slowly and carefully until it makes contact with the jacking point. Continue to raise the jack until the tire is off the ground, but not so high that the vehicle becomes unstable."
Stability Check During Lifting
| Check Point | What to Look For | Action if Problem |
|---|---|---|
| Jack Position | Centered and stable | Lower and reposition |
| Vehicle Movement | No swaying or shifting | Stop and stabilize |
| Surface Contact | Full contact maintained | Check ground stability |
| Jack Angle | Perfectly vertical | Adjust if needed |
Height Considerations
Keep these important factors in mind when determining lift height:
Minimum Height:
- Just enough clearance for task
- Wheel clear of ground
- Room for tools/parts
Maximum Height:
- Never exceed jack's limit
- Maintain vehicle stability
- Consider work requirements
⚠️ STABILITY WARNING: If you notice any wobbling, tilting, or unusual movement during lifting, immediately stop and lower the vehicle. Better to start over than risk an accident.

Using Axle Stands Correctly
Axle stands are not just an optional extra — they're an essential safety requirement for any work under your vehicle. Let's look at how to use them properly to ensure your safety during technical maintenance.
⚠️ CRITICAL SAFETY WARNING: Never, under any circumstances, work under a vehicle supported only by a scissor jack. Axle stands are mandatory for underbody work.
Why Axle Stands are Essential
"Never get under the vehicle when it is supported only by a jack. Always use axle stands for added safety."
Understanding why axle stands are crucial:
Safety Benefits:
- Provide stable, secure support
- Prevent catastrophic failures
- Enable safe underbody access
- Backup support system
Correct Axle Stand Placement
Identify Support Points
- Locate manufacturer-recommended points
- Check for reinforced areas
- Verify surface integrity
Position Stands
- Place stands on solid ground
- Align with support points
- Adjust height as needed
Lower Vehicle
- Slowly lower onto stands
- Maintain even distribution
- Check stability before proceeding
Safety Verification Process
| Check Point | Verification Method | Warning Signs |
|---|---|---|
| Stand Stability | Visual and physical check | Wobbling or tilting |
| Ground Contact | Full base contact | Uneven pressure |
| Vehicle Balance | Even weight distribution | Leaning or shifting |
| Support Point Contact | Proper engagement | Slipping or misalignment |
Weight Distribution Guidelines
Follow these crucial steps for proper weight distribution:
Even Support:
- Use matching stand heights
- Check vehicle is level
- Verify equal weight distribution
Stability Checks:
- Test stability before full weight transfer
- Monitor for movement
- Verify all points are secure
Final Safety Verification
Before proceeding with any work, perform these final checks:
Visual Inspection
- Check all stands are properly positioned
- Verify height pins are engaged
- Ensure stands haven't shifted
Physical Testing
- Gently rock vehicle to test stability
- Check for any movement or settling
- Verify ground hasn't shifted
⚠️ REMEMBER: If you have any doubts about stability, stop work immediately and reassess the setup. Your safety is paramount.
Lowering Your Vehicle Safely
The process of lowering your vehicle is just as critical as lifting it. Follow these steps to ensure a safe completion of your maintenance work.
⚠️ SAFETY ALERT: Clear all tools and equipment from under the vehicle before lowering. Double-check that everyone is at a safe distance.
Pre-Lowering Checklist
Area Check:
- Clear workspace of all tools
- Remove any obstacles
- Ensure good visibility
- Check for proper lighting
Equipment Verification:
- Jack positioned correctly
- Axle stands ready for removal
- Wheel chocks still in place
Lowering Procedure
Initial Preparation
- Position jack under lifting point
- Raise slightly to take weight
- Check stability before proceeding
Remove Axle Stands
- Remove one stand at a time
- Maintain vehicle balance
- Keep stands nearby until finished
Lower Vehicle
- Lower slowly and steadily
- Watch for any catching or binding
- Maintain even descent
"Tighten any loosened parts, such as lug nuts, in a star pattern to ensure even tightening."
Final Checks and Adjustments
| Component | Check For | Action Required |
|---|---|---|
| Wheels | Proper seating | Verify full contact |
| Lug Nuts | Correct torque | Tighten in star pattern |
| Vehicle Level | Even settling | Check all corners |
| Ground Clearance | Normal height | Verify proper stance |
Conclusion
Proper scissor jack usage is crucial for safe 4WD maintenance. By following these comprehensive guidelines, you'll be better equipped to handle vehicle lifting tasks safely and effectively.
Key Takeaways
Safety First:
- Always use axle stands
- Never skip preparation steps
- Check stability continuously
Proper Technique:
- Use correct jacking points
- Follow systematic procedures
- Maintain awareness throughout
Equipment Care:
- Inspect tools regularly
- Store properly when finished
- Replace worn equipment promptly
⚠️ FINAL REMINDER: If you're ever unsure about any aspect of using a scissor jack, don't hesitate to seek professional assistance. Your safety is worth more than any repair cost.